第四章Netty第三节handler&pipeline&ByteBuf
Handler & Pipeline
Pipeline中执行顺序
ChannelHandler用来处理Channel上的各种事件,分为入站和出站。ChannelHandler被连成一串就是pipeline.
- 入站处理器通常是ChannelInBoundHanderAdapter的子类,主要用来读取客户端的数据,写回结果
- 出站处理器通常是ChannelOutboundHandlerAdapter的子类,主要对写回结果进行加工。
打个比喻,channel是产品的加工车间。pipeline是车间中的流水线,经过很多工序的加工:先经过一道道入站工序,再经过一道道出站工序最终变成产品。
服务端:客户单:1
2
3
4
5
6
7
8
9
10
11
12
13
14
15
16
17
18
19
20
21
22
23
24
25
26
27
28
29
30
31
32
33
34
35
36
37
38
39
40
41
42
43
44
45
46
47
48
49
50
51
52
53new ServerBootstrap()
.group(new NioEventLoopGroup())
.channel(NioServerSocketChannel.class)
.childHandler(new ChannelInitializer<NioSocketChannel>() {
protected void initChannel(NioSocketChannel ch) {
ch.pipeline().addLast(new ChannelInboundHandlerAdapter(){
public void channelRead(ChannelHandlerContext ctx, Object msg) {
System.out.println(1);
ctx.fireChannelRead(msg); // 1
}
});
ch.pipeline().addLast(new ChannelInboundHandlerAdapter(){
public void channelRead(ChannelHandlerContext ctx, Object msg) {
System.out.println(2);
ctx.fireChannelRead(msg); // 2
}
});
ch.pipeline().addLast(new ChannelInboundHandlerAdapter(){
public void channelRead(ChannelHandlerContext ctx, Object msg) {
System.out.println(3);
ctx.channel().write(msg); // 3
}
});
ch.pipeline().addLast(new ChannelOutboundHandlerAdapter(){
public void write(ChannelHandlerContext ctx, Object msg,
ChannelPromise promise) {
System.out.println(4);
ctx.write(msg, promise); // 4
}
});
ch.pipeline().addLast(new ChannelOutboundHandlerAdapter(){
public void write(ChannelHandlerContext ctx, Object msg,
ChannelPromise promise) {
System.out.println(5);
ctx.write(msg, promise); // 5
}
});
ch.pipeline().addLast(new ChannelOutboundHandlerAdapter(){
public void write(ChannelHandlerContext ctx, Object msg,
ChannelPromise promise) {
System.out.println(6);
ctx.write(msg, promise); // 6
}
});
}
})
.bind(8080);结果打印:1
2
3
4
5
6
7
8
9
10
11
12
13new Bootstrap()
.group(new NioEventLoopGroup())
.channel(NioSocketChannel.class)
.handler(new ChannelInitializer<Channel>() {
protected void initChannel(Channel ch) {
ch.pipeline().addLast(new StringEncoder());
}
})
.connect("127.0.0.1", 8080)
.addListener((ChannelFutureListener) future -> {
future.channel().writeAndFlush("hello,world");
});可以看到,ChannelInboundHandlerAdapter 是按照 addLast 的顺序执行的,而 ChannelOutboundHandlerAdapter 是按照 addLast 的逆序执行的。ChannelPipeline 的实现是一个 ChannelHandlerContext(包装了 ChannelHandler) 组成的双向链表1
2
3
4
5
61
2
3
6
5
4
- 入站处理器中,ctx.fireChannelRead(msg) 是 调用下一个入站处理器
- 如果注释掉 1 处代码,则仅会打印 1
- 如果注释掉 2 处代码,则仅会打印 1 2
- 3 处的 ctx.channel().write(msg) 会 从尾部开始触发 后续出站处理器的执行
- 如果注释掉 3 处代码,则仅会打印 1 2 3
- 类似的,出站处理器中,ctx.write(msg, promise) 的调用也会 触发上一个出站处理器
- 如果注释掉 6 处代码,则仅会打印 1 2 3 6
- ctx.channel().write(msg) vs ctx.write(msg)
- 都是触发出站处理器的执行
- ctx.channel().write(msg) 从尾部开始查找出站处理器
- ctx.write(msg) 是从当前节点找上一个出站处理器
- 3 处的 ctx.channel().write(msg) 如果改为 ctx.write(msg) 仅会打印 1 2 3,因为节点3 之前没有其它出站处理器
- 6 处的 ctx.write(msg, promise) 如果改为 ctx.channel().write(msg) 会打印 1 2 3 6 6 6… 因为 ctx.channel().write() 是从尾部开始查找,结果又是节点6 自己
下图为服务端 pipeline 触发的原始流程,图中数字代表了处理步骤的先后次序
EmbededChannel调试
主要方法:
- channel.writeInbound
- channel.writeOutbound
通过new EmbededChannel,调用上面方法,能够触发pipeline中的channel事件,handler执行。1
2
3
4
5
6
7
8
9
10
11
12
13
14
15
16
17
18
19
20
21
22
23
24
25
26
27
28
29
30
31
32
33
34ChannelInboundHandlerAdapter ch1 = new ChannelInboundHandlerAdapter(){
public void channelRead(ChannelHandlerContext ctx, Object msg) throws Exception {
log.debug("1");
super.channelRead(ctx, msg);
}
};
ChannelInboundHandlerAdapter ch2 = new ChannelInboundHandlerAdapter(){
public void channelRead(ChannelHandlerContext ctx, Object msg) throws Exception {
log.debug("2");
super.channelRead(ctx, msg);
}
};
ChannelOutboundHandlerAdapter ch3 = new ChannelOutboundHandlerAdapter() {
public void write(ChannelHandlerContext ctx, Object msg, ChannelPromise promise) throws Exception {
log.debug("3");
super.write(ctx, msg, promise);
}
};
ChannelOutboundHandlerAdapter ch4 = new ChannelOutboundHandlerAdapter() {
public void write(ChannelHandlerContext ctx, Object msg, ChannelPromise promise) throws Exception {
log.debug("4");
super.write(ctx, msg, promise);
}
};
EmbeddedChannel channel = new EmbeddedChannel(ch1, ch2, ch3, ch4);
// channel.writeInbound(ByteBufAllocator.DEFAULT.buffer().writeBytes("hello".getBytes()));// 让inbound事件触发
channel.writeOutbound(ByteBufAllocator.DEFAULT.buffer().writeBytes("hello".getBytes()));// 让outbound事件触发
ByteBuf
创建
1 | ByteBuf buffer = ByteBufAllocator.DEFAULT.buffer(10); |
1 | read index:0 write index:0 capacity:10 |
创建默认的ByteBuf(池化基于直接内存),初始容量为10(可扩充,对应一个最大容量)
直接内存 vs 堆内存
直接内存(默认):将数据存放在操作系统的堆外内存中。直接内存的分配和释放不受JVM的垃圾回收控制,减少了GC开销。直接内存创建和销毁的代价高,但是读写性能好(零拷贝技术减少了内核态和用户态数据的复制),配合池化功能一起用。
堆内存:堆内存由JVM自动管理和回收。某些情况下可能导致GC的开销和延迟。
创建池化基于堆的buffer
1 | ByteBuf buffer = ByteBufAllocator.DEFAULT.heapBuffer(10); |
创建池化基于直接内存的 ByteBuf
1 | ByteBuf buffer = ByteBufAllocator.DEFAULT.directBuffer(10); |
池化 vs 非池化
池化的最大意义在于减少创建buffer的时间和重用byteBuf。具体如下:
- 没有池化,每次都得创建新的byteBuf实例,速度慢
- 有了池化,池中提前创建好byteBuf,用完了放回池子,可以重用。
- 高并发时,池化功能更节约内存,减少内存溢出的可能。
组成
ByteBuf由四部分组成

两个指针,分别时读指针和写指针(注意:NIO中的bytebuffer读写指针共用的)
写入
方法列表,省略一些不重要的方法
| 方法签名 | 含义 | 备注 |
|---|---|---|
| writeBoolean(boolean value) | 写入 boolean 值 | 用一字节 01|00 代表 true|false |
| writeByte(int value) | 写入 byte 值 | |
| writeShort(int value) | 写入 short 值 | |
| writeInt(int value) | 写入 int 值 | Big Endian,即 0x250,写入后 00 00 02 50 |
| writeIntLE(int value) | 写入 int 值 | Little Endian,即 0x250,写入后 50 02 00 00 |
| writeLong(long value) | 写入 long 值 | |
| writeChar(int value) | 写入 char 值 | |
| writeFloat(float value) | 写入 float 值 | |
| writeDouble(double value) | 写入 double 值 | |
| writeBytes(ByteBuf src) | 写入 netty 的 ByteBuf | |
| writeBytes(byte[] src) | 写入 byte[] | |
| writeBytes(ByteBuffer src) | 写入 nio 的 ByteBuffer | |
| int writeCharSequence(CharSequence sequence, Charset charset) | 写入字符串 | |
| 大端方式写入(网络传输中习惯大端):将第一个字节(从左到右)写入高位(大端):符合人的正常思维,即 0x00 00 02 50,写入后 00 00 02 50 | ||
| 小端方式写入:将第一个字节(从左到右)写入低位(小端):即 0x00 00 02 50,写入后 50 02 00 00 |
先写入 4 个字节
1 | buffer.writeBytes(new byte[]{1, 2, 3, 4}); |
结果是
1 | read index:0 write index:4 capacity:10 |
再写入一个 int 整数,也是 4 个字节
1 | buffer.writeInt(5); |
结果是
1 | read index:0 write index:8 capacity:10 |
扩容
再写入一个 int 整数时,容量不够了(初始容量是 10),这时会引发扩容
1 | buffer.writeInt(6); |
扩容规则是
- 如何写入后数据大小未超过 512,则选择下一个 16 的整数倍,例如写入后大小为 12 ,则扩容后 capacity 是 16
- 如果写入后数据大小超过 512,则选择下一个 2^n,例如写入后大小为 513,则扩容后 capacity 是 2^10=1024(2^9=512 已经不够了)
- 扩容不能超过 max capacity 会报错
结果是
1 | read index:0 write index:12 capacity:16 |
读取
例如读了 4 次,每次一个字节
1 | System.out.println(buffer.readByte()); |
读过的内容,就属于废弃部分了,再读只能读那些尚未读取的部分
1 | 1 |
如果需要重复读取 int 整数 5,怎么办?
可以在 read 前先做个标记 mark
1 | buffer.markReaderIndex(); |
结果
1 | 5 |
这时要重复读取的话,重置到标记位置 reset
1 | buffer.resetReaderIndex(); |
这时
1 | read index:4 write index:12 capacity:16 |
还有种办法是采用 get 开头的一系列方法,这些方法不会改变 read index
retain & release
由于Nettty由堆外内存的byteBuf实现,堆外内存最好是手动来释放,而不是GC垃圾回收。
- UnpooledHeapByteBuf使用的是JVM内存,只需要等GC回收即可
- UnpooledDirectByteBuf使用的是操作系统的堆外内存,需要特殊的方法来回收内存
- PooledByteBuf和它的子类使用了池化机制,需要更复杂的规则来回收内存
Netty这里使用了引用计数法来控制回收内存,每个ByteBuf都实现了ReferenceCounted接口
- 每个ByteBuf对象的初始计数为1
- 调用release方法计数减1,如果计数为0, ByteBuf内存被回收。
- 调用retain方法计数加1,表示调用者没用完之前,其他handler即使调用了release也不会造成回收。
- 当计数为0时,底层内存会被回收。这时即使ByteBuf对象还在,当各个方法均无法正常使用。
谁来负责release呢?
基本规则是,谁是最后使用者,谁负责release
- 入站ByteBuf处理原则
- 对原始ByteBuf不做处理,调用ctx.fireChannelRead(msg)向后传递,无需release
- 将原始ByteBuf转换为其他类型的Java对象,这时ByteBuf没用了,必须release
- 如果不调用ctx.fireChannelRead(msg)向后传递,那么也必须release
- 注意各种异常,如果ByteBuf没有成功传递到后一个ChannelHandler,必须release
- 假设消息一直往后传,那么TailContext会负责释放未处理消息(原始的ByteBuf)
- 出站ByteBuf处理原则
- 出站消息最终会转为ByteBuf输出, 一直向前传,由headContext flush后release
- 异常处理原则
- 有时候不清楚ByteBuf被引用了多少次,但又必须释放,可以循环调用release直接返回true
TailContext 释放未处理消息逻辑
1 | // io.netty.channel.DefaultChannelPipeline#onUnhandledInboundMessage(java.lang.Object) |
具体代码
1 | // io.netty.util.ReferenceCountUtil#release(java.lang.Object) |
slice
「零拷贝」的体现之一。对原始的ByteBuf进行切片成多个ByteBuf,切片后的ByteBuf并没有发生内存复制,还是使用原来的内存,只是切片后的ByteBuf维护独立的read,write指针。
在这里插入图片描述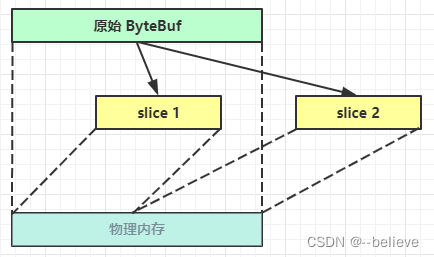
例,原始 ByteBuf 进行一些初始操作
1 | ByteBuf origin = ByteBufAllocator.DEFAULT.buffer(10); |
输出
1 | +-------------------------------------------------+ |
这时调用 slice 进行切片,无参 slice 是从原始 ByteBuf 的 read index 到 write index 之间的内容进行切片,切片后的 max capacity 被固定为这个区间的大小,因此不能追加 write
1 | ByteBuf slice = origin.slice(); |
输出
1 | +-------------------------------------------------+ |
如果原始 ByteBuf 再次读操作(又读了一个字节)
1 | origin.readByte(); |
输出
1 | +-------------------------------------------------+ |
这时的 slice 不受影响,因为它有独立的读写指针
1 | System.out.println(ByteBufUtil.prettyHexDump(slice)); |
输出
1 | +-------------------------------------------------+ |
如果 slice 的内容发生了更改
1 | slice.setByte(2, 5); |
输出
1 | +-------------------------------------------------+ |
这时,原始 ByteBuf 也会受影响,因为底层都是同一块内存
1 | System.out.println(ByteBufUtil.prettyHexDump(origin)); |
输出
1 | +-------------------------------------------------+ |
duplicate
【零拷贝】的体现之一,就好比截取了原始 ByteBuf 所有内容,并且没有 max capacity 的限制,也是与原始 ByteBuf 使用同一块底层内存,只是读写指针是独立的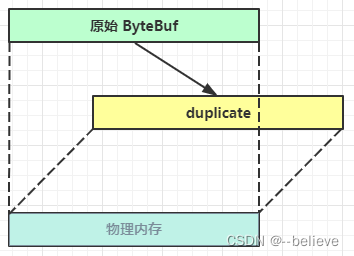
copy
会将底层内存数据进行深拷贝,因此无论读写,都与原始ByteBuf无关。
CompositeByteBuf
【零拷贝】的体现之一,可以将多个 ByteBuf 合并为一个逻辑上的 ByteBuf,避免拷贝
有两个 ByteBuf 如下
1 | ByteBuf buf1 = ByteBufAllocator.DEFAULT.buffer(5); |
输出
1 | +-------------------------------------------------+ |
现在需要一个新的 ByteBuf,内容来自于刚才的 buf1 和 buf2,如何实现?
方法1:
1 | ByteBuf buf3 = ByteBufAllocator.DEFAULT |
结果
1 | +-------------------------------------------------+ |
这种方法好不好?回答是不太好,因为进行了数据的内存复制操作
方法2:
1 | CompositeByteBuf buf3 = ByteBufAllocator.DEFAULT.compositeBuffer(); |
结果是一样的
1 | +-------------------------------------------------+ |
CompositeByteBuf 是一个组合的 ByteBuf,它内部维护了一个 Component 数组,每个 Component 管理一个 ByteBuf,记录了这个 ByteBuf 相对于整体偏移量等信息,代表着整体中某一段的数据。
- 优点,对外是一个虚拟视图,组合这些 ByteBuf 不会产生内存复制
- 缺点,复杂了很多,多次操作会带来性能的损耗
ByteBuf优势
- 池化 - 可以重用池中 ByteBuf 实例,更节约内存,减少内存溢出的可能
- 读写指针分离,不需要像 ByteBuffer 一样切换读写模式
- 可以自动扩容
- 支持链式调用,使用更流畅
- 很多地方体现零拷贝,例如 slice、duplicate、CompositeByteBuf
